
Simple table with automatic breaking
Task
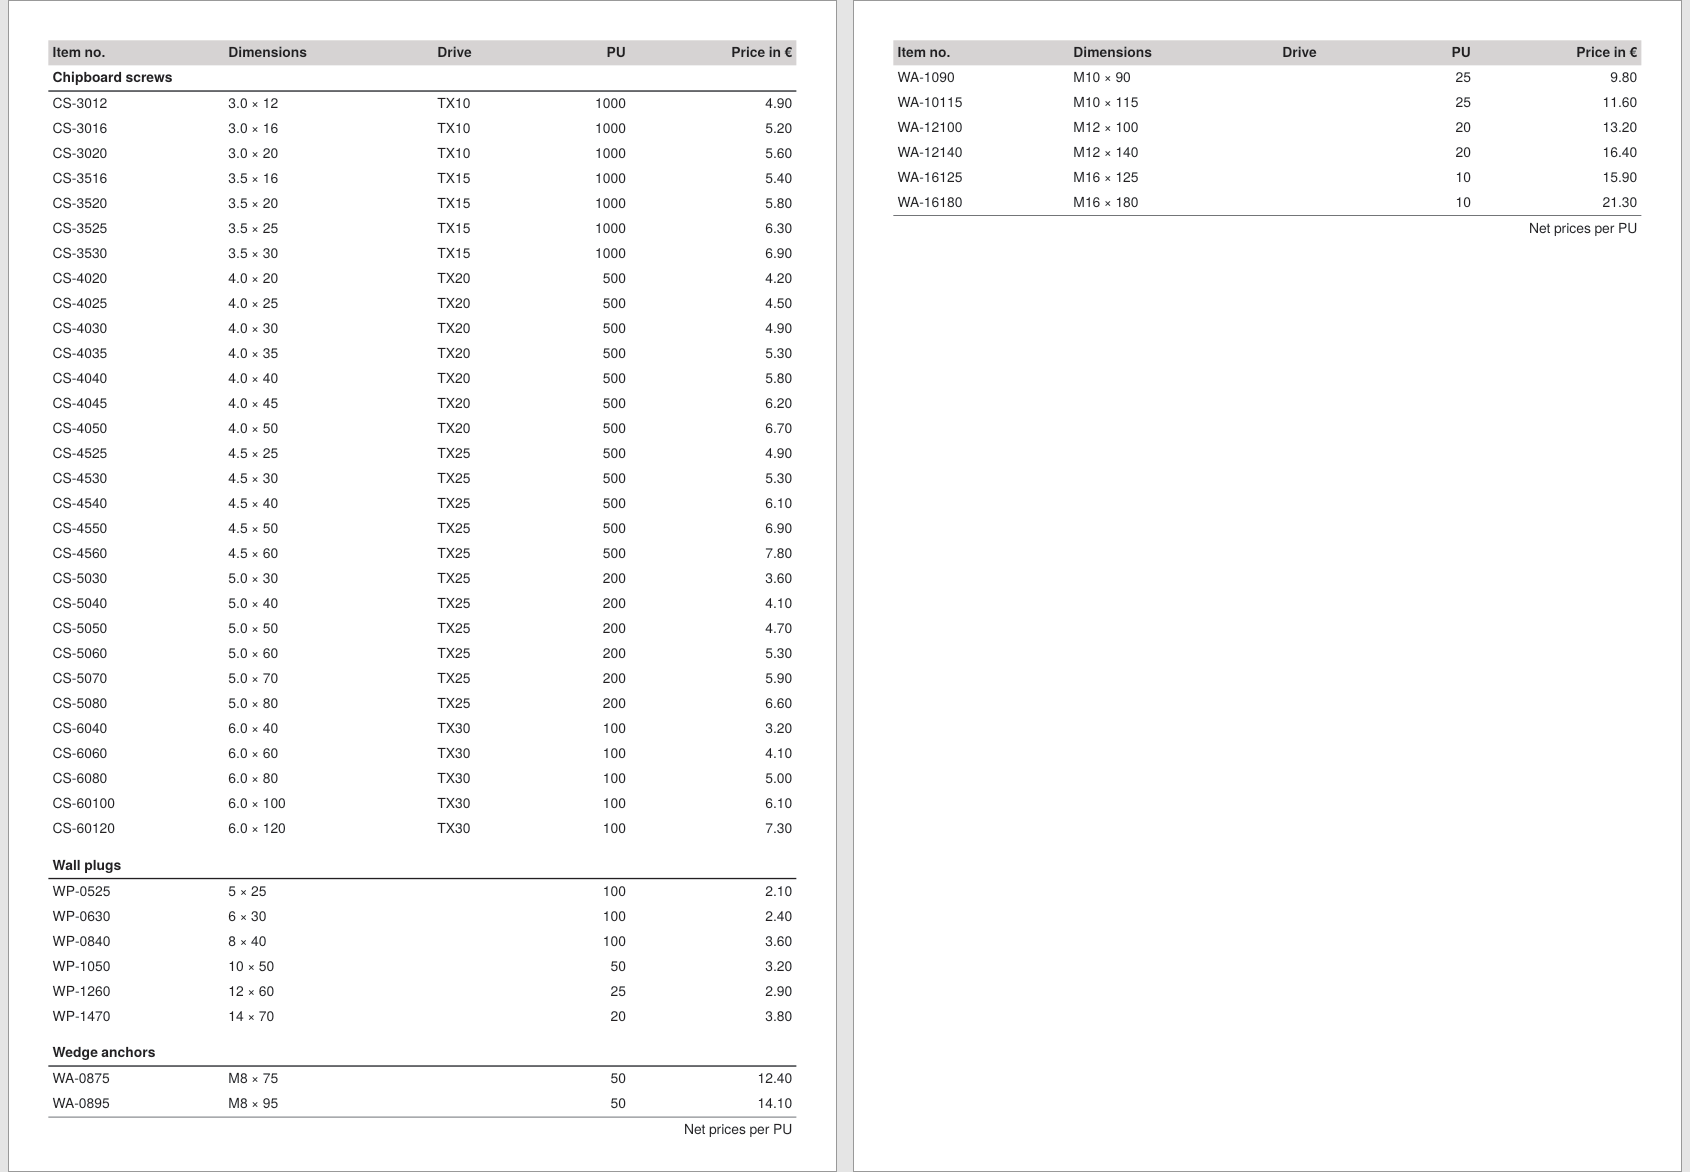
An article list is to be output as a price list. The list is longer than one page: the Publisher should find the page break itself, the table head should repeat on every page, and a closing line appears below the table.
Decision
The automatic table break is the right approach when three things come together:
- The rows are uniform. Every row has the same columns, and the contents should be aligned to each other across all records.
- The break point does not matter. It is irrelevant which article is the last one to fit on a page; the table may even break in the middle of an article group.
- Continuation pages need no special treatment. The repeated head and foot are all it takes.
If one of these conditions does not hold, the path leads elsewhere: with a fixed page design that the content has to fit into, you work with groups and absolute positioning. Running text belongs in <Output>/<Text> rather than in a table. And if continuation pages need their own logic, you have to portion the table yourself (see Limits).
Solution
The data
All how-to guides use the article data of the fictional manufacturer Confixa: article groups (group) contain articles (article) with article number, dimensions, drive, packaging unit (pu) and price per unit. Here is an excerpt; the complete file can be found in the section Complete example:
<data company="Confixa">
  <group name="Chipboard screws" code="CS" material="steel, zinc plated">
    <article number="CS-3012" dim="3.0 × 12" drive="TX10" pu="1000" price="4.90"/>
    <article number="CS-3016" dim="3.0 × 16" drive="TX10" pu="1000" price="5.20"/>
    <!-- more articles -->
  </group>
  <group name="Wall plugs" code="WP" material="nylon">
    <article number="WP-0525" dim="5 × 25" pu="100" price="2.10"/>
    <!-- more articles -->
  </group>
  <!-- more groups -->
</data>
Step 1: The table skeleton
The entry point data outputs the table with <PlaceObject>. That is all it takes for the breaking: if the table is longer than the space on the page, the Publisher distributes the rows onto the following pages by itself.
<Record element="data">
  <PlaceObject>
    <Table stretch="max" padding="3pt">
      <!-- head, foot and rows follow in the next steps -->
    </Table>
  </PlaceObject>
</Record>
stretch="max" stretches the table to the full width of the type area, padding gives all cells some inner spacing. The Publisher distributes the column widths automatically based on the contents.
Step 2: The table head repeats by itself
Everything inside <Tablehead> is output at the beginning of the table and again after every page break:
<Tablehead>
  <Tr background-color="lightgray">
    <Td><Paragraph><B><Value>Item no.</Value></B></Paragraph></Td>
    <Td><Paragraph><B><Value>Dimensions</Value></B></Paragraph></Td>
    <Td><Paragraph><B><Value>Drive</Value></B></Paragraph></Td>
    <Td align="right"><Paragraph><B><Value>PU</Value></B></Paragraph></Td>
    <Td align="right"><Paragraph><B><Value>Price in €</Value></B></Paragraph></Td>
  </Tr>
</Tablehead>
With the attribute page you can define different heads for the first page and the following pages (page="first" and page="all"), for example for a head with the addition “continued”. This is shown in the recipe Continuation head and continuation note.
Step 3: The rows come from the data
Two nested <ForAll> commands create the rows: the outer one iterates over the article groups, the inner one over the articles. Each group starts with a heading row that spans all five columns:
<ForAll select="group">
  <Tr top-distance="8pt" break-below="no">
    <Td colspan="5" border-bottom="1pt">
      <Paragraph><B><Value select="@name"/></B></Paragraph>
    </Td>
  </Tr>
  <ForAll select="article">
    <Tr>
      <Td><Paragraph><Value select="@number"/></Paragraph></Td>
      <Td><Paragraph><Value select="@dim"/></Paragraph></Td>
      <Td><Paragraph><Value select="@drive"/></Paragraph></Td>
      <Td align="right"><Paragraph><Value select="@pu"/></Paragraph></Td>
      <Td align="right"><Paragraph><Value select="@price"/></Paragraph></Td>
    </Tr>
  </ForAll>
</ForAll>
top-distance adds some air before each group heading, border-bottom draws the line below it. With break-below="no" the automatic breaking can be controlled row by row: the page must not break directly below this row, so a group heading is never left behind on its own at the end of a page. The wall plugs have no drive attribute; the cell simply stays empty.
Step 4: The table foot
<Tablefoot> is output at the end of every page, repeated just like the head:
<Tablefoot>
  <Tablerule rulewidth="0.5pt"/>
  <Tr>
    <Td colspan="5" align="right">
      <Paragraph><Value>Net prices per PU</Value></Paragraph>
    </Td>
  </Tr>
</Tablefoot>
Complete example
To reproduce the result, put the two files layout.xml and data.xml into an empty directory and run sp there. The runnable project is also available in the examples repository.
<Layout xmlns="urn:speedata.de:2009/publisher/en"
  xmlns:sd="urn:speedata:2009/publisher/functions/en">

  <Record element="data">
    <PlaceObject>
      <Table stretch="max" padding="3pt">
        <Tablehead>
          <Tr background-color="lightgray">
            <Td><Paragraph><B><Value>Item no.</Value></B></Paragraph></Td>
            <Td><Paragraph><B><Value>Dimensions</Value></B></Paragraph></Td>
            <Td><Paragraph><B><Value>Drive</Value></B></Paragraph></Td>
            <Td align="right"><Paragraph><B><Value>PU</Value></B></Paragraph></Td>
            <Td align="right"><Paragraph><B><Value>Price in €</Value></B></Paragraph></Td>
          </Tr>
        </Tablehead>
        <Tablefoot>
          <Tablerule rulewidth="0.5pt"/>
          <Tr>
            <Td colspan="5" align="right">
              <Paragraph><Value>Net prices per PU</Value></Paragraph>
            </Td>
          </Tr>
        </Tablefoot>
        <ForAll select="group">
          <Tr top-distance="8pt" break-below="no">
            <Td colspan="5" border-bottom="1pt">
              <Paragraph><B><Value select="@name"/></B></Paragraph>
            </Td>
          </Tr>
          <ForAll select="article">
            <Tr>
              <Td><Paragraph><Value select="@number"/></Paragraph></Td>
              <Td><Paragraph><Value select="@dim"/></Paragraph></Td>
              <Td><Paragraph><Value select="@drive"/></Paragraph></Td>
              <Td align="right"><Paragraph><Value select="@pu"/></Paragraph></Td>
              <Td align="right"><Paragraph><Value select="@price"/></Paragraph></Td>
            </Tr>
          </ForAll>
        </ForAll>
      </Table>
    </PlaceObject>
  </Record>
</Layout>
<data company="Confixa">
  <group name="Chipboard screws" code="CS" material="steel, zinc plated">
    <article number="CS-3012" dim="3.0 × 12" drive="TX10" pu="1000" price="4.90"/>
    <article number="CS-3016" dim="3.0 × 16" drive="TX10" pu="1000" price="5.20"/>
    <article number="CS-3020" dim="3.0 × 20" drive="TX10" pu="1000" price="5.60"/>
    <article number="CS-3516" dim="3.5 × 16" drive="TX15" pu="1000" price="5.40"/>
    <article number="CS-3520" dim="3.5 × 20" drive="TX15" pu="1000" price="5.80"/>
    <article number="CS-3525" dim="3.5 × 25" drive="TX15" pu="1000" price="6.30"/>
    <article number="CS-3530" dim="3.5 × 30" drive="TX15" pu="1000" price="6.90"/>
    <article number="CS-4020" dim="4.0 × 20" drive="TX20" pu="500" price="4.20"/>
    <article number="CS-4025" dim="4.0 × 25" drive="TX20" pu="500" price="4.50"/>
    <article number="CS-4030" dim="4.0 × 30" drive="TX20" pu="500" price="4.90"/>
    <article number="CS-4035" dim="4.0 × 35" drive="TX20" pu="500" price="5.30"/>
    <article number="CS-4040" dim="4.0 × 40" drive="TX20" pu="500" price="5.80"/>
    <article number="CS-4045" dim="4.0 × 45" drive="TX20" pu="500" price="6.20"/>
    <article number="CS-4050" dim="4.0 × 50" drive="TX20" pu="500" price="6.70"/>
    <article number="CS-4525" dim="4.5 × 25" drive="TX25" pu="500" price="4.90"/>
    <article number="CS-4530" dim="4.5 × 30" drive="TX25" pu="500" price="5.30"/>
    <article number="CS-4540" dim="4.5 × 40" drive="TX25" pu="500" price="6.10"/>
    <article number="CS-4550" dim="4.5 × 50" drive="TX25" pu="500" price="6.90"/>
    <article number="CS-4560" dim="4.5 × 60" drive="TX25" pu="500" price="7.80"/>
    <article number="CS-5030" dim="5.0 × 30" drive="TX25" pu="200" price="3.60"/>
    <article number="CS-5040" dim="5.0 × 40" drive="TX25" pu="200" price="4.10"/>
    <article number="CS-5050" dim="5.0 × 50" drive="TX25" pu="200" price="4.70"/>
    <article number="CS-5060" dim="5.0 × 60" drive="TX25" pu="200" price="5.30"/>
    <article number="CS-5070" dim="5.0 × 70" drive="TX25" pu="200" price="5.90"/>
    <article number="CS-5080" dim="5.0 × 80" drive="TX25" pu="200" price="6.60"/>
    <article number="CS-6040" dim="6.0 × 40" drive="TX30" pu="100" price="3.20"/>
    <article number="CS-6060" dim="6.0 × 60" drive="TX30" pu="100" price="4.10"/>
    <article number="CS-6080" dim="6.0 × 80" drive="TX30" pu="100" price="5.00"/>
    <article number="CS-60100" dim="6.0 × 100" drive="TX30" pu="100" price="6.10"/>
    <article number="CS-60120" dim="6.0 × 120" drive="TX30" pu="100" price="7.30"/>
  </group>
  <group name="Wall plugs" code="WP" material="nylon">
    <article number="WP-0525" dim="5 × 25" pu="100" price="2.10"/>
    <article number="WP-0630" dim="6 × 30" pu="100" price="2.40"/>
    <article number="WP-0840" dim="8 × 40" pu="100" price="3.60"/>
    <article number="WP-1050" dim="10 × 50" pu="50" price="3.20"/>
    <article number="WP-1260" dim="12 × 60" pu="25" price="2.90"/>
    <article number="WP-1470" dim="14 × 70" pu="20" price="3.80"/>
  </group>
  <group name="Wedge anchors" code="WA" material="steel, zinc plated">
    <article number="WA-0875" dim="M8 × 75" pu="50" price="12.40"/>
    <article number="WA-0895" dim="M8 × 95" pu="50" price="14.10"/>
    <article number="WA-1090" dim="M10 × 90" pu="25" price="9.80"/>
    <article number="WA-10115" dim="M10 × 115" pu="25" price="11.60"/>
    <article number="WA-12100" dim="M12 × 100" pu="20" price="13.20"/>
    <article number="WA-12140" dim="M12 × 140" pu="20" price="16.40"/>
    <article number="WA-16125" dim="M16 × 125" pu="10" price="15.90"/>
    <article number="WA-16180" dim="M16 × 180" pu="10" price="21.30"/>
  </group>
</data>
Limits
- Column widths: The Publisher distributes the widths based on the contents. If columns should get fixed or proportional widths, declare them with
<Columns>/<Column>; this is shown in the recipe Controlling column widths. - Continuation head and continuation note: If the head on the following pages should read “continued”, or a continuation note should appear at the end of the page, you need page-dependent heads and feet; this is shown in the recipe Continuation head and continuation note.
- Custom logic on continuation pages: If the content of a continuation page depends on the break point (for example with complex continuation images), the automatic mechanism is no longer enough. In that case you portion the data yourself, measure with groups and output one table per portion; this is shown in the recipe Breaking complex tables manually.
- All details about tables: the manual chapter Tables and the reference for
<Table>,<Tablehead>and<Tablefoot>.