
Tables
The table model used in the Publisher is basically the same as that of HTML.
Basic structure of a table
The structure of a table looks like this:
<PlaceObject>
  <Table>
    <Tr>
      <Td>...</Td>
      <Td>...</Td>
    </Tr>
    <Tr>
      <Td>...</Td>
      <Td>...</Td>
    </Tr>
  </Table>
</PlaceObject>
The width of the table is determined by the contents. If stretch="no" (default) is specified for the <Table> command, the table will only take up the minimum width. If stretch="max" is specified, the full specified width (or the maximum available space) is used.
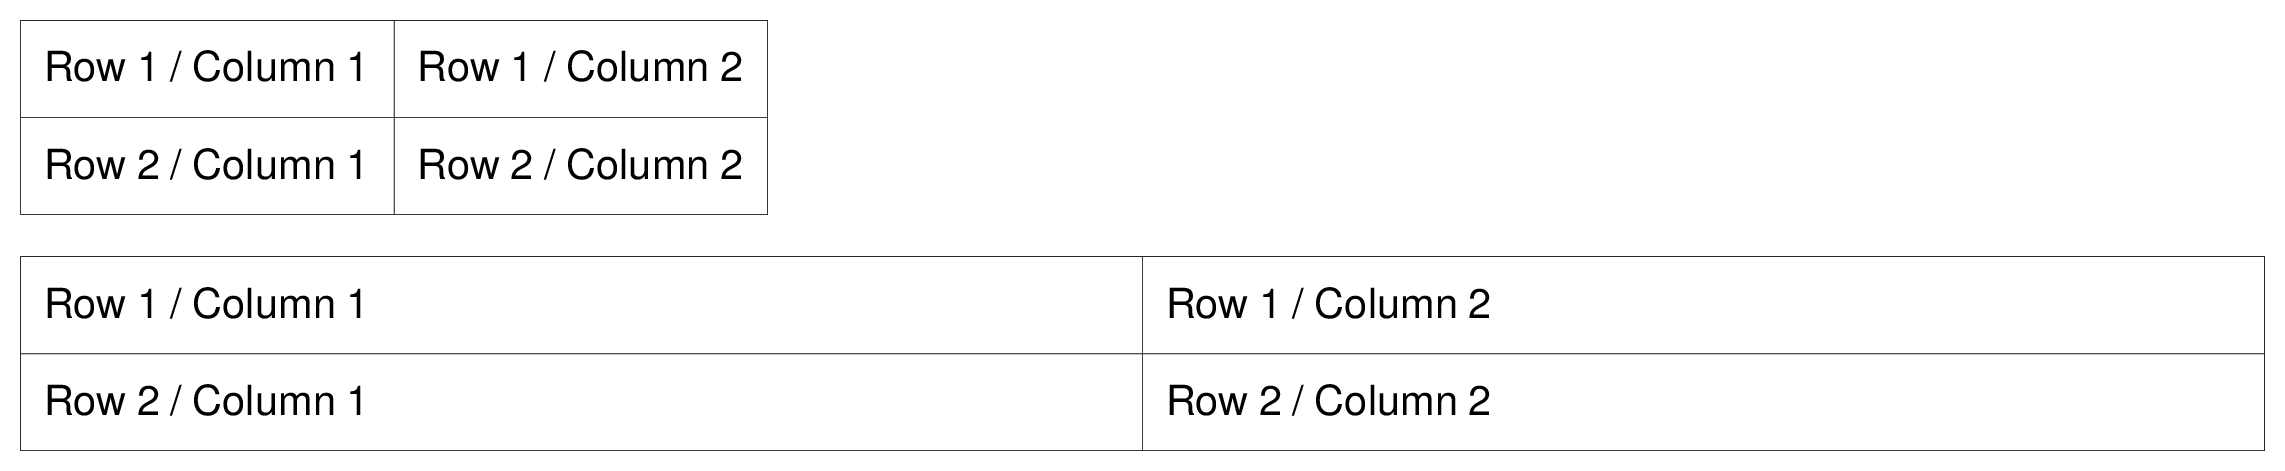
<Layout xmlns="urn:speedata.de:2009/publisher/en"
  xmlns:sd="urn:speedata:2009/publisher/functions/en">
  <Trace grid="no" objects="yes"/>

  <Record element="data">
    <PlaceObject>
      <Table padding="2mm" stretch="no" >
        <Tr>
          <Td>
            <Paragraph><Value>Row 1 / Column 1</Value></Paragraph>
          </Td>
          <Td>
            <Paragraph><Value>Row 1 / Column 2</Value></Paragraph>
          </Td>
        </Tr>
        <Tr>
          <Td>
            <Paragraph><Value>Row 2 / Column 1</Value></Paragraph>
          </Td>
          <Td>
            <Paragraph><Value>Row 2 / Column 2</Value></Paragraph>
          </Td>
        </Tr>
      </Table>
    </PlaceObject>
  </Record>
</Layout>
There are some settings that apply to the entire table, such as the font, inner spacing, line and column spacing. These are described in the appendix in the reference for the <Table> command.
Table cells and table rows, lines in tables
Table rows
Statements in table rows (<Tr>) determine properties for all cells in that row, provided they are not overwritten in the cell itself. For example, align and valign specify the horizontal and vertical alignment of cells. That is, in the line
<Tr align="left">
  <Td>...</Td>
  <Td>...</Td>
  <Td align="right">...</Td>
</Tr>
all columns except the last have the alignment “left-aligned”.
You can also specify the background color for the individual columns in the line (background-color). You can also specify the minimum height (minheight, specified in grid cells or a dimension) and the space above the cell, provided it does not follow a page break.
Cells
The table cells (<Td>) have extensive formatting options. For example, the padding for each of the four sides can be defined individually. The cell border on each page can also differ in thickness and color. The cell border always lies within a table, with the exception that the borders “overlap” with adjacent cells and the border-collapse option activated in
Alignment for <Td> | Text | Format Description |
|---|---|---|
left | __leftaligned | Left-aligned, ragged right |
right | __rightaligned | Right-aligned, ragged left |
center | __centered | Centered, ragged on both sides |
justify | __justified | Justified on both sides |
This means that the two examples are identical:
<Td align="left">
  <Paragraph>
    <Value>....</Value>
  </Paragraph>
</Td>

<Td align="left">
  <Paragraph textformat="__leftaligned">
    <Value>....</Value>
  </Paragraph>
</Td>
For example, by changing the text format __leftaligned, all table cells can be formatted with left alignment.
Colspan and Rowspan
The natural property of a table is that all cells in a row are the same height and all cells in a column are the same width. However, cells can extend over several columns and rows. The number of spanned columns is specified with colspan, the default here is 1. The number of rows is specified with rowspan, the default here is 1 as well. Here, you must ensure that the sum of the columns in a row equals the total number. Instead of a fixed number, you can use colspan="*" to span all remaining columns from the current position. This is useful when the number of columns may change and you want a cell to always fill the rest of the row.
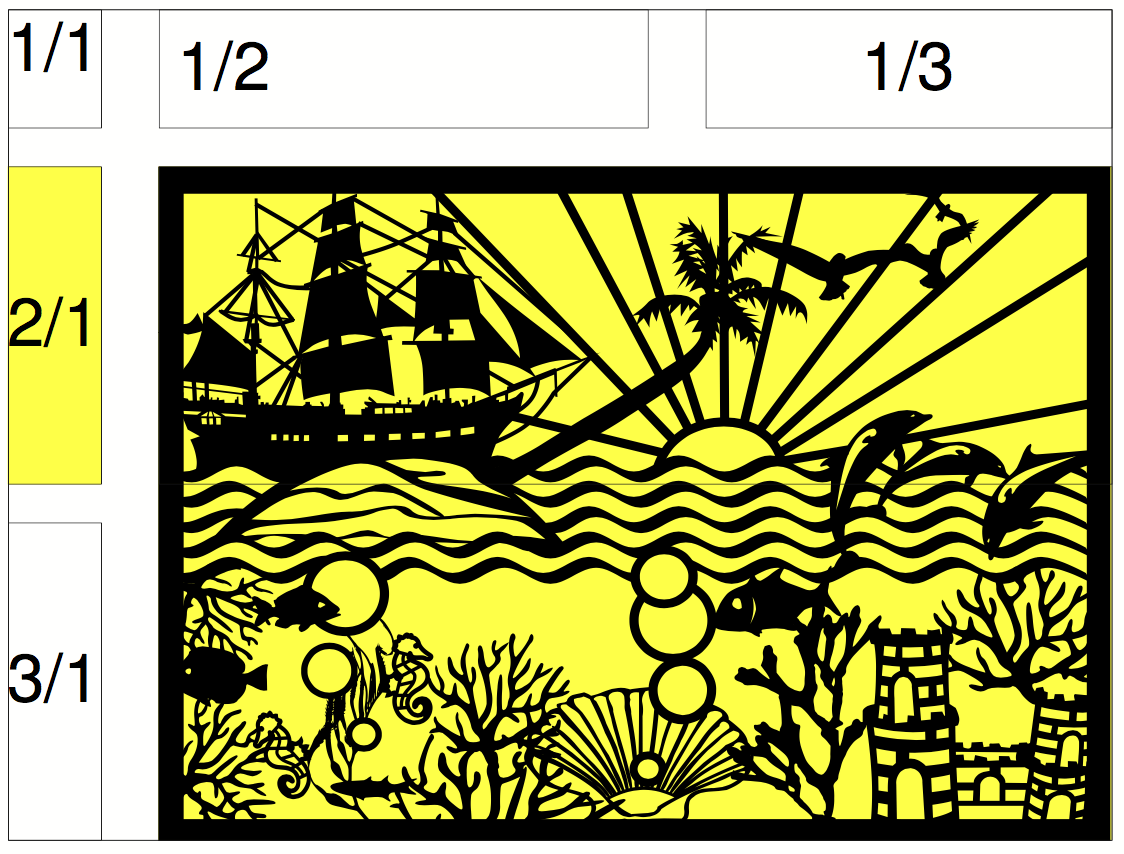
In the following example, the second row contains only two cells, but it extends over two columns. The third row even has only one cell definition, the rest of the row is occupied by the two cell wide image from the row above (rowspan="2").
<PlaceObject>
  <Table width="10"
    columndistance="3mm"
    leading="2mm">
    <Tr>
      <Td padding-bottom="2mm">
        <Paragraph><Value>1/1</Value></Paragraph>
      </Td>
      <Td padding-left="1mm">
        <Paragraph><Value>1/2</Value></Paragraph>
      </Td>
      <Td align="center">
        <Paragraph><Value>1/3</Value></Paragraph>
      </Td>
    </Tr>
    <Tr background-color="yellow">
      <Td>
        <Paragraph><Value>2/1</Value></Paragraph>
      </Td>
      <Td rowspan="2" colspan="2" >
        <Image width="5" file="ocean.pdf"/>
      </Td>
    </Tr>
    <Tr align="center">
      <Td>
        <Paragraph><Value>3/1</Value></Paragraph>
      </Td>
    </Tr>
  </Table>
</PlaceObject>
Specifying the column widths
In the previous examples the widths of the cells are automatically determined by the content. You can also specify fixed column widths. The command for this is called Columns and is listed directly as the first command within Table:
<Table stretch="max">
  <Columns>
    <Column width="2mm"/>
    <Column width="1*"/>
    <Column width="3*"/>
  </Columns>
  <Tr>
    ...
  </Tr>
</Table>
Here it is specified that the table has three columns. The first column has a width of 2mm, the second and third columns divide the remaining width in a ratio of 1 to 3.
Instead of a fixed width or a * specification, you can also specify the keywords min and max:
<Trace objects="yes" />
<Table>
    <Columns>
        <Column width="min" />
        <Column width="max" />
    </Columns>
    <Tr valign="top">
        <Td>
            <Paragraph>
                <Value>The quick brown fox</Value>
            </Paragraph>
        </Td>
        <Td>
            <Paragraph>
                <Value>The quick brown fox</Value>
            </Paragraph>
        </Td>
    </Tr>
</Table>
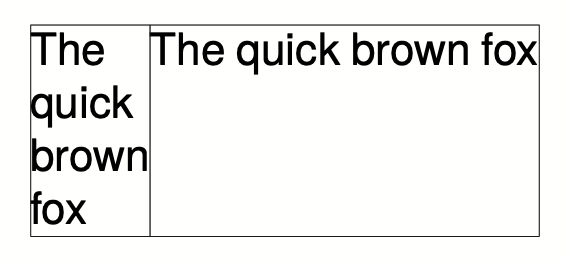
min in the width specification means that the column will be as narrow as possible, max means that the column will be as wide as necessary.
In addition to specifying min or max for column widths, you can also use minwidth to specify the minimum width of a column.
The available space can also be calculated using the natural width of the content with a “?” specification for the column. This is useful in connection with fixed column specifications:
<PlaceObject>
    <Table stretch="max" width="240pt" border-collapse="collapse">
        <Columns>
            <Column width="40pt" />
            <Column width="?" />
            <Column width="?" />
        </Columns>
        <Tr>
            <Td>
                <Paragraph><Value>40pt</Value></Paragraph>
            </Td>
            <Td>
                <Paragraph><Value>The quick</Value></Paragraph>
            </Td>
            <Td>
                <Paragraph>
                  <Value>The quick freezer jumps into the
                   kitchen and ate the brown fox.</Value>
                </Paragraph>
            </Td>
        </Tr>
    </Table>
</PlaceObject>

In the Column command, you can also define further specifications for the column: the horizontal and vertical alignment and the background color can be specified. A specification for a cell overwrites the default.
Table wraps
If the table is too high for the page, it wraps and continues on the next page. The space still available on the current page and on the subsequent pages is taken into account. The break can be inserted after each line, as long as break-below is not set to yes in the line. Individual table cells are not separated.
You can insert your own headers and footers for the table break, which are repeated on each page. These are discussed in detail in the next three sections.
Headers and footers (static)
There are two ways to define table headers in tables. The first variant is presented in this section. It is particularly suitable if the table header is known at the beginning (static). The second variant is suitable if certain table cells are to serve as header lines (sections in tables). You can also combine both variants.
The starting point is a simple table:
<Layout xmlns="urn:speedata.de:2009/publisher/en"
  xmlns:sd="urn:speedata:2009/publisher/functions/en">

  <Record element="data">
    <PlaceObject>
      <Table>
        <Loop select="200">
          <Tr>
            <Td>
              <Paragraph>
                <Value>Tablecontents</Value>
              </Paragraph>
            </Td>
          </Tr>
        </Loop>
      </Table>
    </PlaceObject>
  </Record>
</Layout>
The header line is defined in the table as follows (as child element of the element <Table>):
<Tablehead>
  <Tr background-color="gray">
    <Td>
      <Paragraph>
        <Value>Head</Value>
      </Paragraph>
    </Td>
  </Tr>
</Tablehead>
You can define the header for the first page separately by specifying the page attribute (default is all):
<Tablehead page="all">
  <!--1-->
</Tablehead>

<Tablehead page="first">
  <!--2-->
</Tablehead>
- Table header for all pages
- If
page="first"is defined as here, the above definition (1) applies to all pages, but not to the first page, because here (2) applies.
With this variant you can not only define the (repeating) table header, but also the table footer. This works in the same way as <Tablehead>, except that page selection is allowed instead of first last.
<Tablefoot page="last">
  <Tr background-color="gray">
    <Td>
      <Paragraph>
        <Value>Table foot last page</Value>
      </Paragraph>
    </Td>
  </Tr>
</Tablefoot>
<Tablefoot page="all">
  <Tr background-color="gray">
    <Td>
      <Paragraph>
        <Value>Table foot for all pages</Value>
      </Paragraph>
    </Td>
  </Tr>
</Tablefoot>
Table headers and footers do not have to consist of only one line. They can also contain lines and multiple lines. If some parts are left empty, the output will be discarded.
<Tablefoot page="last" />
<Tablefoot page="all">
  <Tr background-color="gray">
    <Td>
      <Paragraph>
        <Value>Table foot for all pages</Value>
      </Paragraph>
    </Td>
  </Tr>
</Tablefoot>
page="last") is empty.Headers and footers (dynamic)
In the previous section, the table header is created using <Tablehead> (and its counterpart <Tablefoot>). In contrast, this section shows how to create a dynamic table header. Both variants can be combined.
<Tr sethead="yes" background-color="lightgray">
  <Td>
    <Paragraph>
      <Value>New head</Value>
    </Paragraph>
  </Td>
</Tr>
The “magic” is in sethead="yes" in the table row. This automatically repeats this line at the top of the next page, just below any static table header. This is very suitable for subheadings or sections in tables.
Example
A somewhat constructed example. There are two sections in the table with two and eight lines. The file data.xml:
<data>
  <section name="section 1" rows="2"/>
  <section name="section 2" rows="8"/>
</data>
The layout outputs a table, for each section the heading is displayed as a line in which the attribute sethead is set to yes. The desired lines are output in a loop.
<Layout xmlns="urn:speedata.de:2009/publisher/en">
  <Pageformat width="100mm" height="60mm"/>

  <Record element="data">
    <PlaceObject>
      <Table padding="1mm" stretch="max">
        <ForAll select="section">
          <Tr sethead="yes" background-color="lightgray">
            <Td>
              <Paragraph>
                <Value select="@name"/>
              </Paragraph>
            </Td>
          </Tr>
          <Loop select="@rows" variable="i">
            <Tr>
              <Td>
                <Paragraph>
                  <Value select="concat('Row ', $i)"/>
                </Paragraph>
              </Td>
            </Tr>
          </Loop>
        </ForAll>
      </Table>
    </PlaceObject>
  </Record>
</Layout>
Headers and footers with running sum
Sometimes you may want to display a subtotal or carryover in headers or footers of tables. The problem here is that this is dynamic information, which is determined by the space available. If the page is shorter, the sum is different. This means that you cannot define the number in advance as a header or footer.
Instead, there is the possibility to store data in a table row:
<Tr data="..." >
This data can later be retrieved in headers and footers with the special variable _last_tr_data. The variable is overwritten each time data="..." is used. To illustrate this, there is a complete set of layout rules that uses this mechanism:
<Layout
  xmlns="urn:speedata.de:2009/publisher/en"
  xmlns:sd="urn:speedata:2009/publisher/functions/en">
  <Pageformat width="80mm" height="80mm" />

  <Record element="data">
    <!-- Initialize value for the first header line -->
    <SetVariable variable="_last_tr_data" select="0"/>
    <SetVariable variable="sum" select="0"/>

    <PlaceObject>
      <Table stretch="max">
        <Tablehead>
          <Tr background-color="#eee">
            <Td>
              <Paragraph>
                <Value>Value of $_last_tr_data: </Value>
                <Value select="$_last_tr_data"/>
              </Paragraph>
            </Td>
          </Tr>
        </Tablehead>
        <Loop select="100" variable="i">
          <SetVariable variable="sum" select="$sum + $i"/>
          <Tr data="$sum">
            <Td>
              <Paragraph>
                <Value select="concat('i = ',$i)"/>
              </Paragraph>
            </Td>
          </Tr>
        </Loop>
      </Table>
    </PlaceObject>
  </Record>
</Layout>
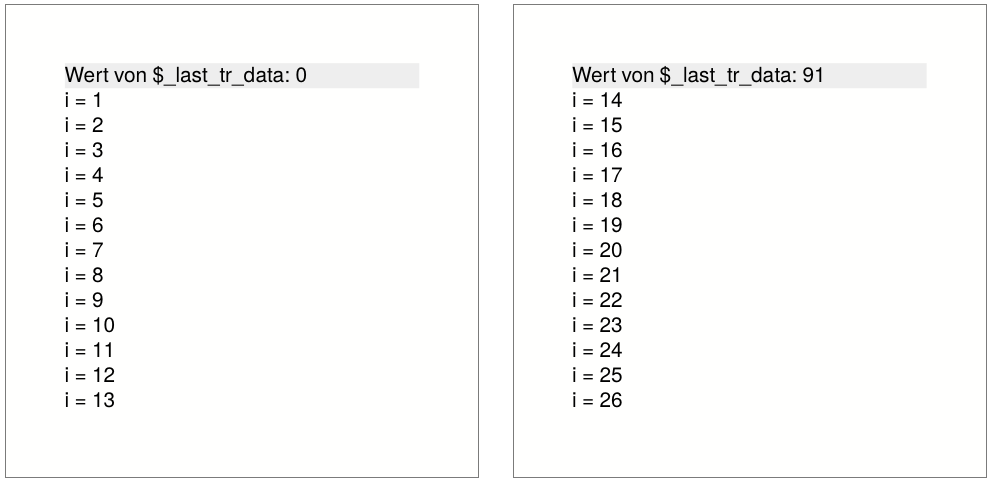
Here first the header line is defined, then 100 lines are generated (<Loop select="100">), the loop number is stored and then the calculated value is stored in each line with data="$sum", which is later output in the header line.
The width of the dynamic header and footer is calculated without _last_tr_data. This can lead to problems if the newly calculated header or footer has a different format. |
Assembling tables
Sometimes tables are not created in one piece. A common pattern when creating tables is to test whether a table still fits in a certain place. This is done by appending a table line by line and placing it in a group (a virtual space), which is then measured. The procedure for this is as follows:
<SetVariable variable="newtablerows">
  <Copy-of select="$tablerows"/>
  <Copy-of select="$thisrow"/>
</SetVariable>
Where $this line is a table line with start and end tag <Tr> .. </Tr> and $table lines are empty or contain several lines of the same form.
The check now takes place by creating the table in a group and then checking the height of the group, for example:
<Group name="tbl">
  <Contents>
    <PlaceObject>
      <Table width="...">
        <Copy-of select="$tablerowsnew"/>
      </Table>
    </PlaceObject>
  </Contents>
</Group>

<Switch>
  <Case test="sd:group-height('tbl') > ...">
    <!-- too large, print table without the last row -->
    <PlaceObject>
      <Table width="...">
        <Copy-of select="$tablerows"/>
      </Table>
    </PlaceObject>
    <!-- last line is now as carry forward for the next table -->
    <SetVariable variable="tablerows">
      <Copy-of select="$thisrow"/>
    </SetVariable>
  </Case>
  <Otherwise>
    <!-- fits, output table, set variable -->
    <PlaceObject groupname="tbl"/>
    <SetVariable variable="tablerows">
        <Copy-of select="$tablerowsnew"/>
    </SetVariable>
  </Otherwise>
</Switch>
A more detailed description can be found in the section layoutoptimizationusinggroups.
Alternating line colors
Alternating row colors are often used in tables with many columns to help the eye read the table. The row color can be specified by background-color="..." at <Tr>.
<Table>
  <Loop select="5" variable="i">
    <Tr background-color="{sd:alternating('tab', 'white', 'gray')}">
      <Td>
        <Paragraph>
          <Value>Row </Value>
          <Value select="$i"/>
        </Paragraph>
      </Td>
    </Tr>
  </Loop>
</Table>
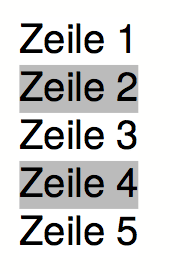
The trick here is to use the layout function sd:alternating(), which switches between arguments. Since the attribute background-color expects a fixed value, the curly brackets must be used to jump to “XPath mode”.
After the table has been output, there is no guarantee that the next call to sd:alternating() with the identification tab will start with the first value again. This depends on which value was used last. To ensure that the table starts with the first value again, you can use the attribute eval="..." for <Table>:
<Table eval="sd:reset-alternating('tab')">
  ...
</Table>
This resets the counter for the specified identifier (tab).
Alternating colors with page breaks
When a table with alternating row colors spans multiple pages, the color pattern continues from the creation order. This means the first row on a new page may start with the wrong color. To restart the alternating pattern on each page, use the eval-on-split attribute on the <Table> element:
<Table eval-on-split="sd:reset-alternating('tab')">
  <Loop select="100" variable="i">
    <Tr background-color="{sd:alternating('tab', 'white', 'gray')}">
      <Td>
        <Paragraph>
          <Value>Row </Value>
          <Value select="$i"/>
        </Paragraph>
      </Td>
    </Tr>
  </Loop>
</Table>
The expression given in eval-on-split is evaluated at each page break before the table continues. It resets the alternating counter so that sd:alternating() starts again from the first value on each new page. After the expression is evaluated, the background-color attribute of each <Tr> in the new page is re-evaluated from the original layout XML.
This also works with dynamic headers (sethead="yes") and section headings. For example, to have a gray section heading that resets the alternating counter, put the reset directly into the background-color attribute:
<Tr background-color="{sd:reset-alternating('tab')}lightgray"
    sethead="yes">
  <Td>
    <Paragraph><Value>Section heading</Value></Paragraph>
  </Td>
</Tr>
Here, {sd:reset-alternating('tab')} evaluates to an empty string (as a side effect, the counter is reset), and lightgray is appended as the actual color value. Because eval-on-split re-evaluates each row’s background-color attribute, the reset also fires when the heading is repeated on a new page.
eval-on-split only re-evaluates the background-color attribute of <Tr> elements. If the alternating color is set on <Td> or via <SetVariable>, it will not be re-evaluated at page breaks. To use eval-on-split, the sd:alternating() call must be in the <Tr> background-color attribute. |
Background in table rows
Text in the background
With the attributes background-… you can put text in the background.
<Table width="7">
  <Tr>
    <Td background-text="Neu"
      background-size="contain"
      background-textcolor="gray"
      background-transform="rotate(-40deg)">
      <Paragraph>
        <Value select="sd:loremipsum()"/>
      </Paragraph>
    </Td>
  </Tr>
</Table>
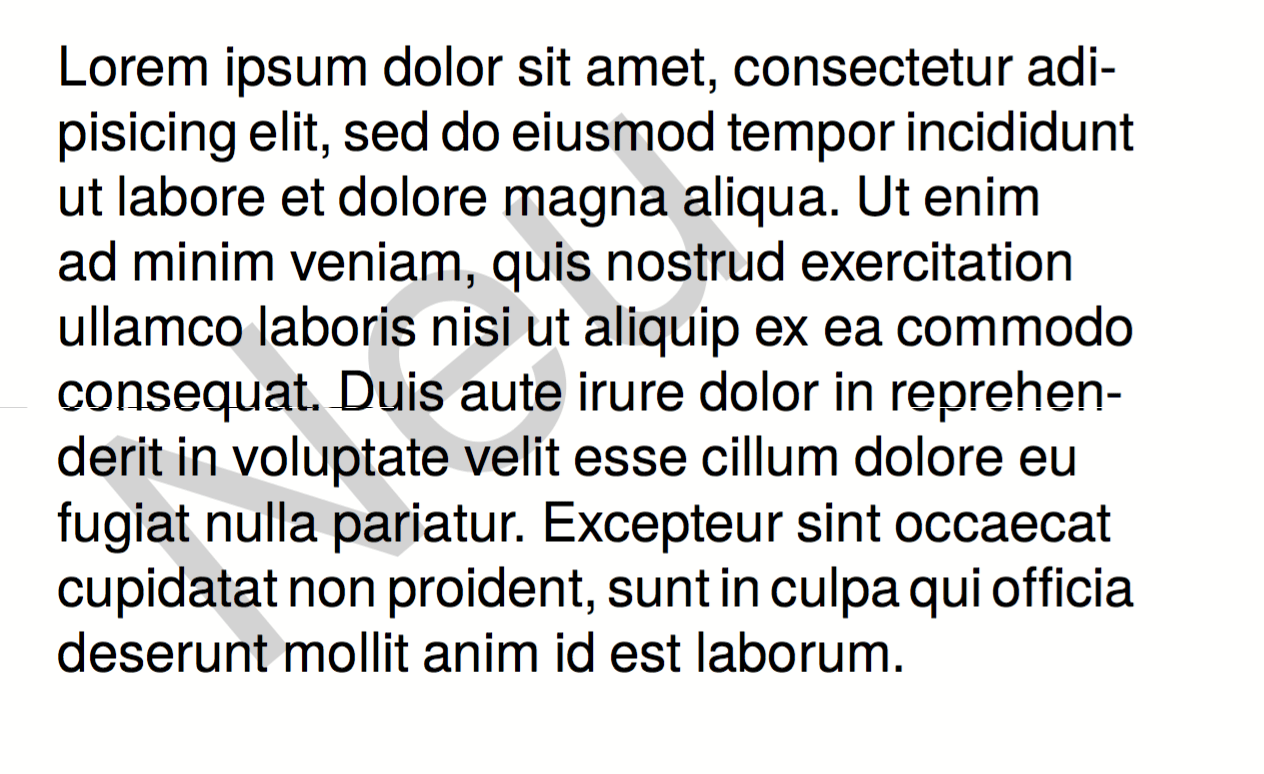
Image behind the text
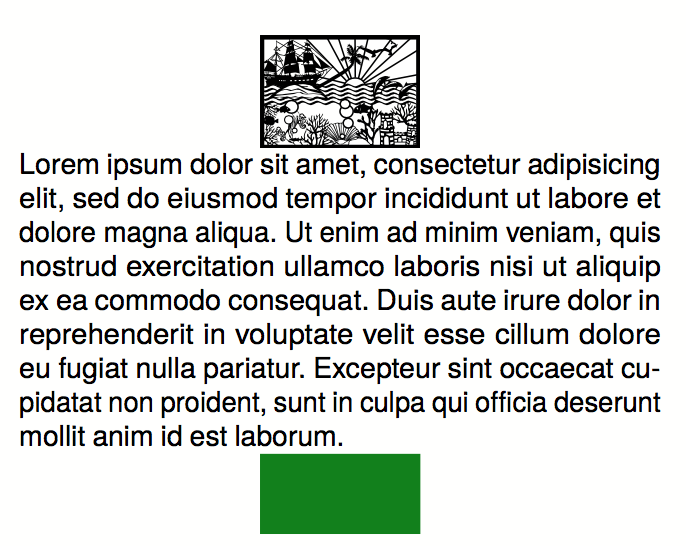
With the command <Overlay> you can overlay elements. In table cells, this can be used to overlay text (like references to the author of an image) over an image. But you can also put whole texts on top of each other. Whether it makes sense or not, may be put there.
<DefineFontfamily name="mini" fontsize="6" leading="8">
  <Regular fontface="TeXGyreHeros-Regular"/>
</DefineFontfamily>

<Record element="data">
  <PlaceObject>
    <Table width="7">
      <Tr>
        <Td>
          <Overlay>
            <Image width="4.5cm" file="_samplea.pdf"/>
            <Position x="100" y="10">
              <!-- Rotate 90 degrees -->
                <Transformation matrix="0 1 -1 0 0 0"
                  origin-x="0" origin-y="100">
                  <Textblock width="4" fontfamily="mini">
                    <Paragraph textformat="left">
                      <Value>Photo: Reinhard M.</Value>
                    </Paragraph>
                  </Textblock>
                </Transformation>
            </Position>
          </Overlay>
        </Td>
      </Tr>
    </Table>
  </PlaceObject>
</Record>

Clearing columns
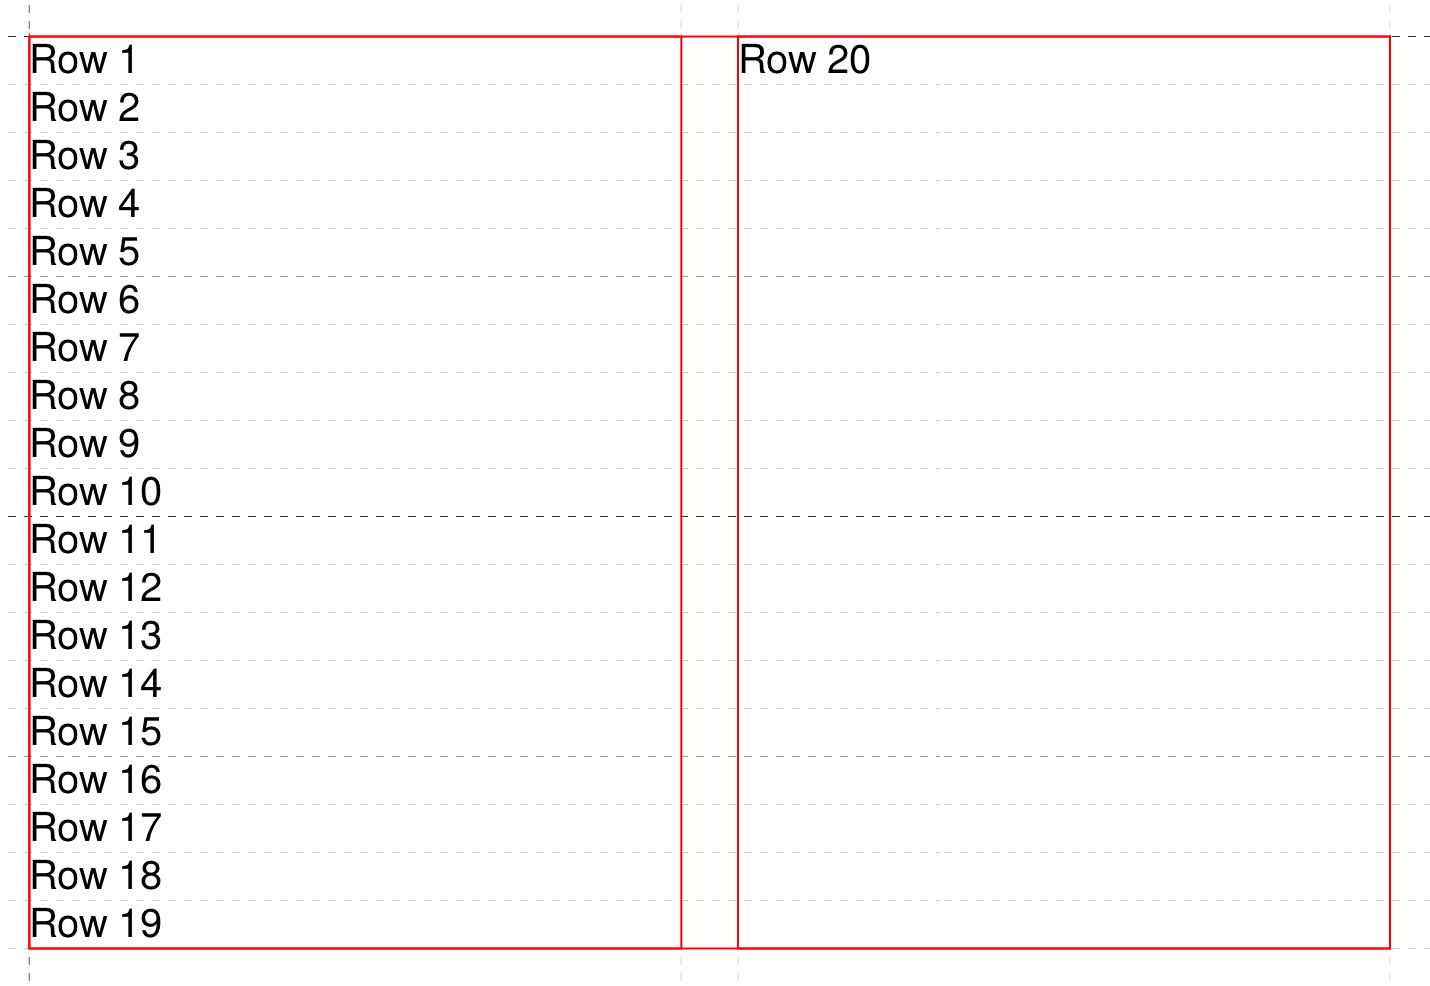
Usually, a table uses first the first positioning frame of an area, then the next, and so on.
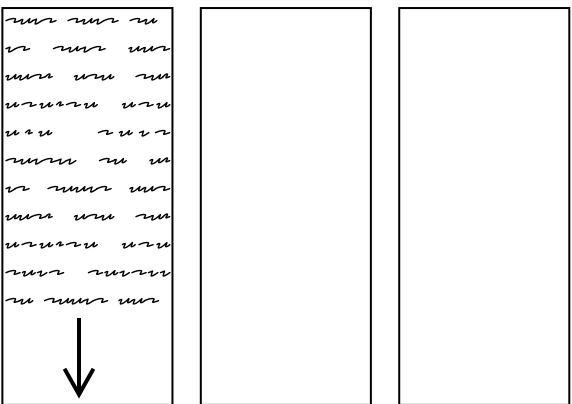
If you now switch to <Table balance="yes">, the table is output as follows:
For this to work, the table must be output in a placement area, not on a page. The number of columns to be balanced is determined by the number of placement frames the area contains. Here is a concrete example:
<Layout xmlns="urn:speedata.de:2009/publisher/en"
  xmlns:sd="urn:speedata:2009/publisher/functions/en">
  <Trace grid="yes"/>
  <SetGrid nx="2" dx="5mm" height="12pt"/>
  <Pageformat width="140mm" height="100mm"/>
  <Pagetype name="page" test="true()">
    <Margin left="1cm" right="1cm" top="1cm" bottom="1cm"/>
    <PositioningArea name="twocolumns">
      <PositioningFrame width="1" height="{sd:number-of-rows()}" row="1" column="1"/>
      <PositioningFrame width="1" height="{sd:number-of-rows()}" row="1" column="2"/>
    </PositioningArea>
  </Pagetype>

  <Record element="data">
    <PlaceObject area="twocolumns">
      <Table balance="no">
        <Loop select="20" variable="i">
          <Tr>
            <Td><Paragraph><Value>Row </Value><Value select="$i"/></Paragraph></Td>
          </Tr>
        </Loop>
      </Table>
    </PlaceObject>
  </Record>
</Layout>
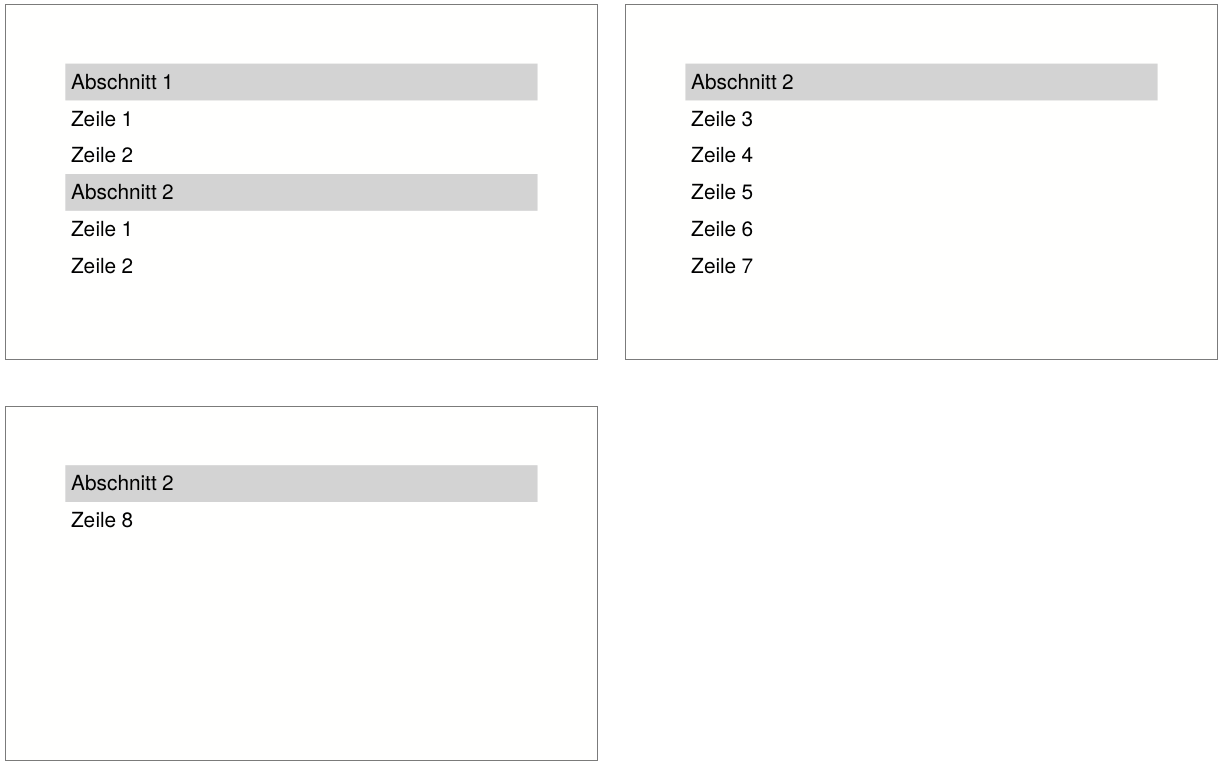
With balance="no" as in the example there is a full first column:
If, on the other hand, you set balance="yes", the result is
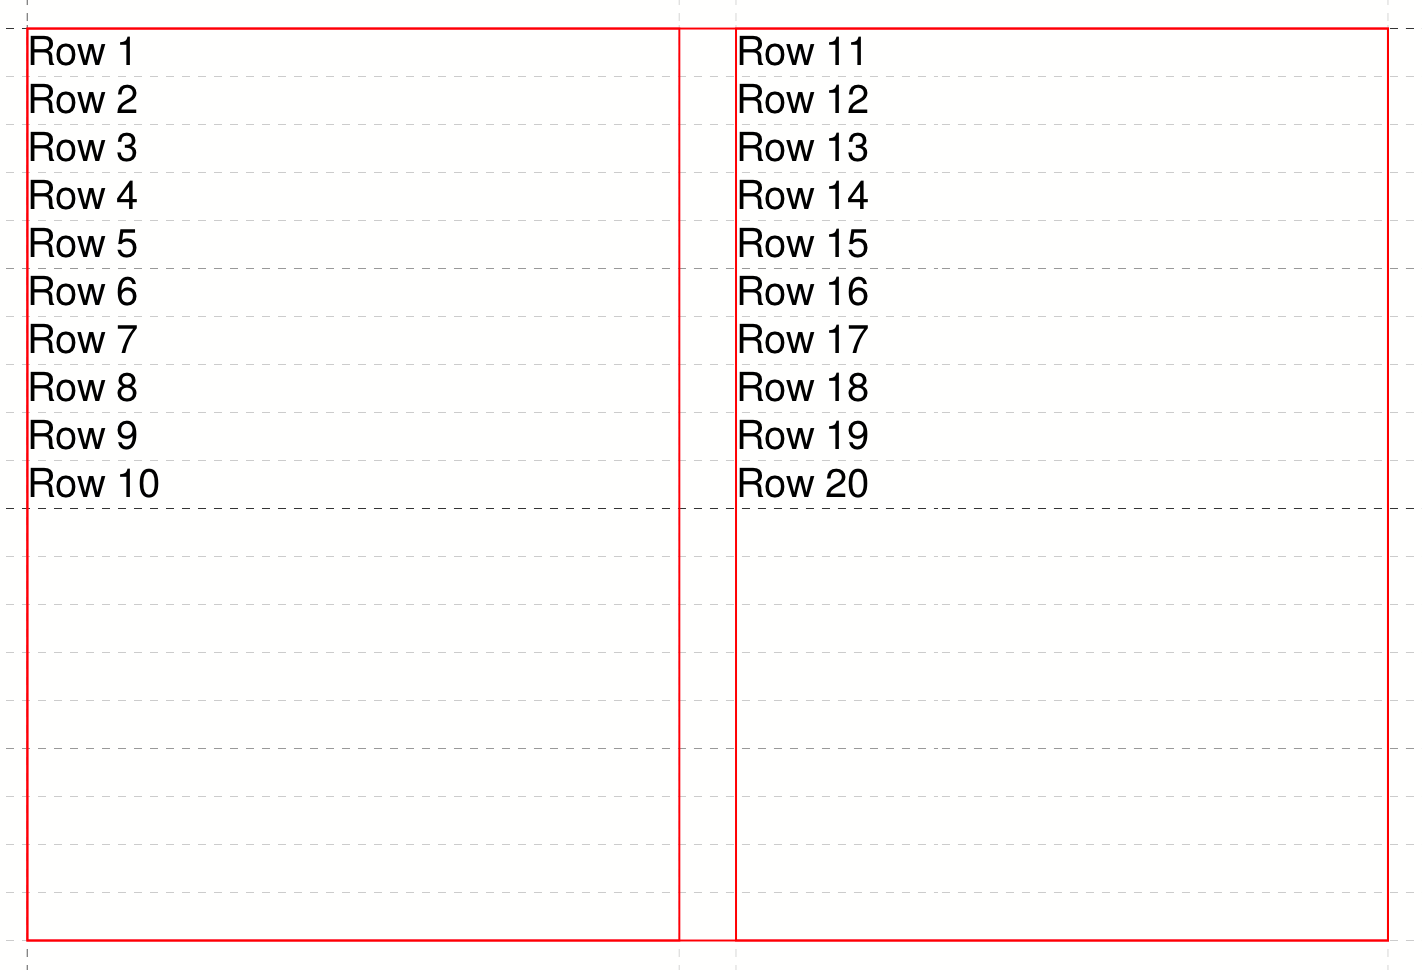
The specification is always observed on the last page of a table, since the previous pages fill the space completely anyway.
Page change in tables
If a table is larger than the available space on the page, the table is continued on the next page or in the next placement frame.
The command <TableNewPage> is used to force such a page change.
Tables and font sizes
To typeset tables with small font sizes, you need to set a small fontfamily in the table definition:
<DefineFontfamily fontsize="6pt" leading="6pt" name="mini">
    <Regular fontface="sans" />
</DefineFontfamily>
<Trace objects="yes" />
<Record element="data">
    <PlaceObject>
        <Table fontfamily="mini">
            <Loop select="4">
                <Tr>
                    <Loop select="4">
                        <Td>
                            <Paragraph fontfamily="mini">
                                <Value>Covfefe</Value>
                            </Paragraph>
                        </Td>
                    </Loop>
                </Tr>
            </Loop>
        </Table>
    </PlaceObject>
</Record>
If the fontfamily is omitted in the <Table> command, larger vertical will be the result. This is only important for font families smaller than the family text, which has the size 10pt/12pt as the default size.