Outputting objects#
The command to place objects on a page is called <PlaceObject>.
The parameters are listed in detail in the command reference. Here are some examples and possible applications.
In the simplest case, the command can be used as follows:
<Record element="data">
  <PlaceObject>
    <Image href="_samplea.pdf" width="5"/>
  </PlaceObject>
</Record>
Here an image is loaded with the specified file name and a specified width. The image _samplea.pdf (with underscore at the beginning) is included in the distribution and can be used as a placeholder.
Grid based placement of objects#
The section about grids provides a detailed description of the design grid. Only so much should be mentioned here: The grid helps on the one hand to position the objects (easy arrangement of the objects) and on the other hand to find the right place. Grid cells are not occupied by two objects at the same time, unless you explicitly allow this.
This is an example of grid-based output. The specifications for row and column are coordinates in the page grid, where the upper left corner is position 1,1.
Order of the objects#
The order in which the individual objects are output is important: the objects are drawn on top of each other. This means that objects that are output later overlap the previous objects. This can be useful for background images. In <AtPageCreation> you can output a stationery or page header, which is then overwritten with real content in the actual data processing. Or you can include a ready-made page and provide it with the correct page number:
<Layout xmlns="urn:speedata.de/2021/xts/en"
  xmlns:sd="urn:speedata.de/2021/xtsfunctions/en">

  <Record element="data">
    <PlaceObject row="1" column="1">
      <Image file="termsofservice.pdf" width="180mm" height="280mm"/>
    </PlaceObject>
    <PlaceObject column="1" row="{sd:number-of-rows()}">
      <Textblock>
        <Paragraph>
          <Value select="sd:current-page()"/>
        </Paragraph>
      </Textblock>
    </PlaceObject>
  </Record>
</Layout>
Here the page is first integrated and then the current page number is "printed" right-justified in the last line.
Height and width of the objects#
Images, barcodes, boxes etc. have fixed widths and heights. Texts and tables use the available width. That is, the width is the difference between the number of grid cells and the start column plus 1. For an example width of 15 grid boxes and a start column of 6, the text width is 10, unless otherwise specified.
If an object (such as images) requires a width or height specification, this can be given either as an absolute value (e.g. 5cm) or in grid cells.
Text block#
This is a rectangular text area that is not wrapped over multiple pages. Text blocks are ideal for page numbers, short descriptions, column titles and all other units where page breaks are not desired.
A block of text can contain one or more paragraphs.
Further formatting options are described in the section about fonts.

The complete description of <Textblock> can be found in the reference (section Textblock).
Introduction to tables#
The table model used in XTS corresponds approximately to the model known from HTML.
The rows are specified with <Tr> and the individual columns with <Td>.
The structure of a simple table without column declaration, header and footer looks as follows:
<PlaceObject>
  <Table>
    <Tr>
      <Td>...</Td>
      <Td>...</Td>
    </Tr>
    <Tr>
      <Td>...</Td>
      <Td>...</Td>
    </Tr>
  </Table>
</PlaceObject>
The contents of the table cells can be paragraphs, pictures and other objects.
<Td>
  <Paragraph>
    <Value>...</Value>
  </Paragraph>
</Td>

<Td>
  <Image file="ocean.pdf" width="4"/>
</Td>
A practical feature of tables is that they can run over several pages, even with repeating headers and footers.
The table cells can contain text, images, barcodes, etc.; in other words, anything that can also be contained in `
A separate chapter is devoted to the topic of tables (TBD).
Images#
Including images is, as already shown at the beginning, very easy. The command for this is `
Images can be in the formats PDF, JPEG and PNG and can be integrated. All other formats such as Tiff or SVG must be converted first.
The command for embedding images is very powerful and is described in detail in a separate section (TBD). The reference contains a short description of all possibilities.
Rectangular areas (<Box>)#
Rectangular surfaces are created with the command <Box>.

<Box>Boxes are often used for colored areas behind a text or table.
In this case the allocation of the raster cells must be switched off (allocate="no" at <PlaceObject>), otherwise a warning will be issued because of the double allocation of the area in the PDF (see section grid).
An example for the use of boxes as background can be found in the section about grip marks.
There, the parameter bleed is also explained, which is used to enlarge the box in one or more directions, if they are located at the page margin.
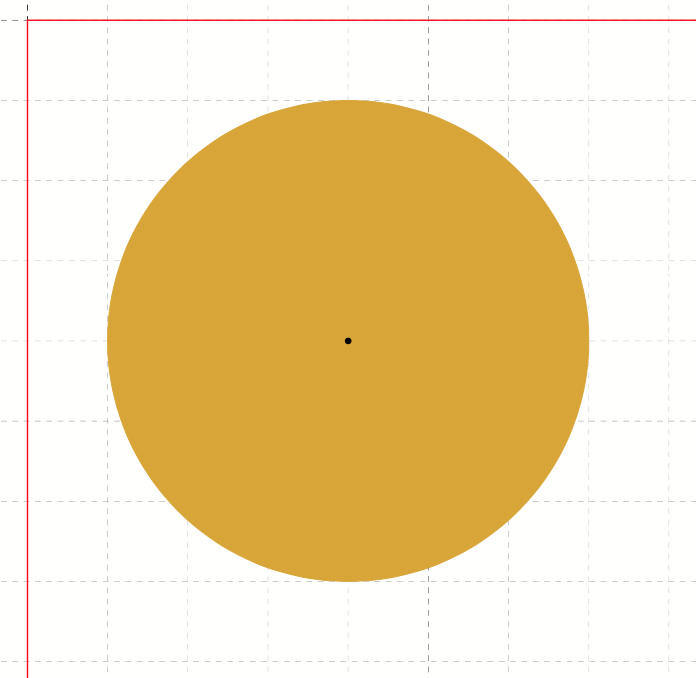
Circle#
Circles are output with the command <Circle>:
<Record element="data">
  <PlaceObject column="5" row="5">
    <Circle radiusx="3" backgroundcolor="goldenrod"/>
  </PlaceObject>
  <PlaceObject column="5" row="5">
    <Circle radiusx="1pt" backgroundcolor="black"/>
  </PlaceObject>
</Record>
In this example the radius of the large circle is 3 grid boxes and the center of the circle is in the upper left corner of the box (5.5). So it starts in the second column and the second row and extends to the seventh column and row. Circles have the special property that no grid cells are marked as allocated.
Barcodes, QR Codes#
Barcodes or QR codes are integrated via the command <Barcode>:
The output is as expected

Barcodes in the coding "EAN13" and "Code 128" can be output.