Virtual pages
With the Virtual Pages you can create and discard pages, similar to the Virtual Areas (Groups).
For this purpose there are the commands <SavePages> and <InsertPages> and the layout function sd:count-saved-pages().
The first command has the effect that the output within the command is not written to the PDF.
With the second command you can output these saved pages.
The layout function determines the number of saved pages.
Example
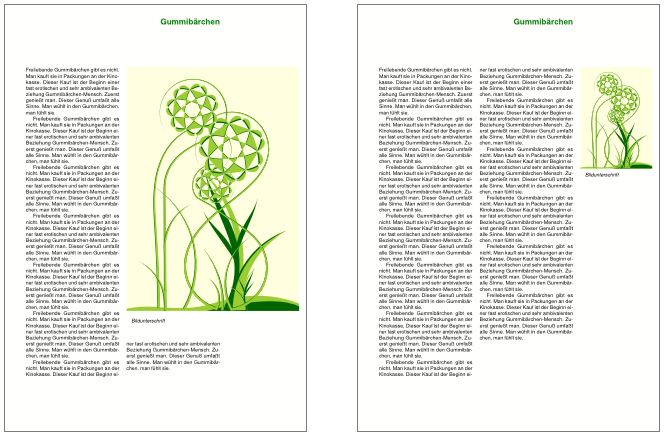
Text and an image should be displayed on exactly one page, with the image displayed as large as possible and preferably in the text flow.
Now the text is to be set with different parameters until the text and image fit exactly on one page, i.e. the page number from sd:count-saved-pages() gives the value 1.
The data file data.xml is structured as follows:
<?xml version="1.0" encoding="UTF-8"?>
<journal>
  <article ueberschrift="Gummibärchen">
    <text>
      <paragraph>Freilebende Gummibärchen gibt es nicht.
        Man kauft sie in Packungen an der
        Kinokasse. Dieser Kauf ist der Beginn
        einer fast erotischen und sehr ambivalenten
        Beziehung Gummibärchen-Mensch. Zuerst genießt man.
        Dieser Genuß umfaßt alle Sinne.
        Man wühlt in den Gummibärchen, man fühlt sie.
      </paragraph>
    </text>
  </article>
</journal>
The layout file is somewhat more extensive and is explained in several stages:
<Layout xmlns="urn:speedata.de:2009/publisher/en"
  xmlns:sd="urn:speedata:2009/publisher/functions/en">

  <Options ignoreeol="yes" mainlanguage="German"/> ①

  <DefineFontfamily name="title" fontsize="16" leading="16"> ②
    <Regular fontface="sans-bold"/>
  </DefineFontfamily>

  <SetGrid width="5mm" height="12pt"/> ③

  <Pagetype name="text" test="true()">
    <Margin left="1.5cm" right="0.5cm" top="1cm" bottom="2cm"/>

    <PositioningArea name="heading"> ④
      <PositioningFrame width="27" height="8" row="1" column="1"/>
    </PositioningArea>

    <PositioningArea name="text"> ⑤
      <PositioningFrame width="13" height="51" row="9" column="1"/>
      <PositioningFrame width="13" height="51" row="9" column="15"/>
    </PositioningArea>
  </Pagetype>
①
The head is back to normal. The ignoreeol option says that the line breaks in the data should be ignored.
② Then the font size for the header is set. The body text will use the default font size of 10/12 point.
③ If you set the grid height equal to the normal line spacing, you can easily achieve register-true typesetting. The page type defines two page areas (see section Areas on the page (PositioningArea))
④ The header area covers the first 8 lines and is independent of the text area.
⑤ The area for the text consists of two columns.
The actual data processing follows. In the beginning the specifications for the image position and image size are defined. The variable 'i' then selects the default 1, 2 or 3.
  <Record element="Journal">

    <!-- Variant 1: The picture goes over the whole width -->
    <SetVariable variable="imagewidth1" select="38"/>
    <SetVariable variable="imagecolumn1" select="1"/>

    <!-- Variant 2: The picture starts in the second column -->
    <SetVariable variable="imagewidth2" select="24"/>
    <SetVariable variable="imagecolumn2" select="15"/>

    <!-- Variant 3: The picture appears on the right side -->
    <SetVariable variable="imagewidth3" select="10"/>
    <SetVariable variable="imagecolumn3" select="29"/>
Now follows the decision about virtual pages.
    <SetVariable variable="i" select="0"/>
    <Until test="$i = 3"> ①
      <SetVariable variable="i" select="$i + 1"/>

      <SavePages name="pagewithimage"> ②
        ③
        <PlaceObject column="{sd:variable('imagecolumn',$i)}" row="9">
          <Image width="{sd:variable('imagewidth',$i)}" file="_sampleb.pdf"/>
        </PlaceObject>
        <NextRow/>

        <PlaceObject column="{sd:variable('imagecolumn',$i)}"> ④
          <Table stretch="max" padding="3pt">
            <Tr>
              <Td padding-left="10pt" align="left">
                <Paragraph>
                  <I><Value>Figure caption</Value></I>
                </Paragraph>
              </Td>
            </Tr>
            <Tablerule rulewidth="20pt" color="white"/>
          </Table>
        </PlaceObject>

        <ProcessNode select="article"/> ⑤
      </SavePages>

      <Switch> ⑥
        <Case test="sd:count-saved-pages('pagewithimage') = 1 ">
          <SetVariable variable="i" select="3"/>
        </Case>
      </Switch>

    </Until>
    <InsertPages name="pagewithimage"/> ⑦
  </Record>
① The loop is run through for the values i = 1, i = 2 and i = 3
② From here on, the contents are stored temporarily.
③ Here the image with the specifications is output.
④ Here the caption.
⑤ Now the text is output.
⑥ If the desired page number (1) is reached, i is set to 3 to abort the loop prematurely.
⑦ Now the saved pages are output.
What is still missing is the output of the text.
This is triggered in <ProcessNode select="Article"/> above.
Since this is an example, we create a paragraph in a loop.
  <Record element="article">
    <Output area="title">
      <Text>
        <Paragraph textformat="title" fontfamily="title">
          <Color name="green">
            <Value select="@title"/>
          </Color>
        </Paragraph>
      </Text>
    </Output>

    <Loop select="7" variable="c">
      <Output area="text" allocate="auto">
        <Text>
          <Paragraph fontfamily="text">
            <Value select="text/paragraph"/>
          </Paragraph>
        </Text>
      </Output>
    </Loop>
  </Record>
</Layout>
Side construction with 7 or 12 paragraphs. In the first case the default "2" is used, in the second case the default "3" is used.