Automatically generated directories
This chapter is dedicated to the creation of directories.
There are basically two ways to create a directory.
Therefore, the next section is about the built-in mechanism of markers (<Mark>), the following sections are about the way via <Element> and <Attributes> and manually saving the data for another pass.
|
In order for the Publisher to run through several times, the runs parameter must be set on the command line or in the configuration file, for example with sp --runs=2 (command line) or runs = 2 (configuration file). In the section Create table of contents in one go a mechanism is shown how in some cases a directory can be created in only one run.
|
Markers
Markers are invisible characters that are inserted into the text.
A name is always assigned to these characters.
After the character is output on a page, you can ask the Publisher for the page number.
The structure is as follows:
<PlaceObject>
  <Textblock>
    <Action>
      <Mark select="'textstart'"/>
    </Action>
    <Paragraph>
      <Value>
      Row
      Row
      Row
      Row
       </Value>
    </Paragraph>
  </Textblock>
</PlaceObject>
After outputting the page, the page number can now be determined with sd:pagenumber('textstart').
The markers are automatically stored in an internal auxiliary file publisher.aux so that when the page numbers are scanned again with sd:pagenumber(), they are available before the page is placed.
A simple text structure is used as an example (it is the same example as in the next section):
<data>
  <chapter titel="Foreword">
    <text>...</text>
  </chapter>
  <chapter titel="Introduction">
    <text>...</text>
  </chapter>
  <chapter titel="Conclusion">
    <text>...</text>
  </chapter>
</data>
Which is output with the following layout:
<Layout
  xmlns="urn:speedata.de:2009/publisher/en"
  xmlns:sd="urn:speedata:2009/publisher/functions/en">

  <DefineFontfamily name="title" fontsize="18" leading="20">
    <Regular fontface="sans"/>
  </DefineFontfamily>

  <Record element="data">
    <!-- This point will be completed further below -->
    <ProcessNode select="chapter"/>
  </Record>

  <Record element="chapter">
    <PlaceObject>
      <Textblock>
        <Action>
          <Mark select="@title"/>
        </Action>
        <Paragraph fontfamily="title">
          <Value select="@title"/>
        </Paragraph>
        <Paragraph>
          <Value select="text"/>
        </Paragraph>
      </Textblock>
    </PlaceObject>
    <ClearPage/>
  </Record>
</Layout>
The basic framework for the markers. The place for the table of contents will be extended later (see comment).
The Publisher now assigns the chapters to the page number. You can now output the directory in the next pass:
  <PlaceObject>
    <Table padding="5pt">
      <ForAll select="chapter">
        <Tr>
          <Td><Paragraph><Value select="@title"/></Paragraph></Td>
          <Td><Paragraph>
               <Value select="sd:pagenumber(@title)"/> ①
          </Paragraph></Td>
        </Tr>
      </ForAll>
    </Table>
  </PlaceObject>
  <ClearPage/>
This part is inserted into the layout above to output the table of contents.
①
In a further pass, the page numbers are available before the actual chapters are written to the following pages.
Create directories (XML structure)
In the previous chapter, directories were created about the markers.
In this chapter a mechanism is used which means a bit more manual work, but is more flexible.
The speedata Publisher can create any directory type.
Whether table of contents, article list or keyword index - all lists work on the same principle:
the necessary data (e.g. page numbers, article numbers) are explicitly stored in a separate data structure, written to disk.
The next time the Publisher is run, this data is read in and is available.
The two commands <Element> and <Attribute> are used to structure data that is read during processing.
This has already been described in the chapter Creation of XML structures.
These commands can be used to create new XML data set files.
The following structure could be useful for an article list:
<articlelist>
  <article number="1" page="10"/>
  <article number="2" page="12"/>
  <article number="3" page="14"/>
</articlelist>
To create this structure in the layout rules, it must be composed of the commands `<Element>' and `<Attributes>' as follows
<Element name="articlelist">
  <Element name="article">
    <Attribute name="number" select="1"/>
    <Attribute name="page" select="10"/>
  </Element>
  <Element name="article">
    <Attribute name="number" select="2"/>
    <Attribute name="page" select="12"/>
  </Element>
  <Element name="article">
    <Attribute name="number" select="3"/>
    <Attribute name="page" select="14"/>
  </Element>
</Element>
With the command <SaveDataset> this structure is saved to disk and with <LoadDataset> it is loaded again.
If the file does not exist when loading, no error is reported, because it could be the first pass where the file naturally does not yet exist.
Immediately after loading, XML processing is continued with the first element of the currently loaded structure. In the example above, the following command would be searched for in the layout ruleset
<Record element="articlelist">
  ...
</Record>
This means that the actual data processing is temporarily interrupted and continued with the new data set from <LoadDataset>.
Example
This is the same example as in the previous section (Automatically generated directories). A simple data file is used as an example:
<data>
  <chapter title="Foreword">
    <text>...</text>
  </chapter>
  <chapter title="Introduction">
    <text>...</text>
  </chapter>
  <chapter title="Conclusion">
    <text>...</text>
  </chapter>
</data>
Which is output with the following layout:
<Layout
  xmlns="urn:speedata.de:2009/publisher/en"
  xmlns:sd="urn:speedata:2009/publisher/functions/en">

  <DefineFontfamily name="title" fontsize="18" leading="20">
    <Regular fontface="sans"/>
  </DefineFontfamily>

  ①

  ②
  <Record element="data">
    <ProcessNode select="chapter"/>
  </Record>

  <Record element="chapter">
    ③
    <PlaceObject>
      <Textblock>
        <Paragraph fontfamily="title">
          <Value select="@title"/>
        </Paragraph>
        <Paragraph>
          <Value select="text"/>
        </Paragraph>
      </Textblock>
    </PlaceObject>
    <ClearPage/>
  </Record>
</Layout>
Basic framework for the output of a table of contents via the XML structure. The code is added during the course of the section.
①
The output of the actual table of contents is inserted here.
②
The section 'data' is extended by loading and saving the XML data for the directory
③
Here code is inserted that assembles the XML structure (see below)
Now a variable is defined (entries), which contains the information about the chapter beginnings.
The target structure should be as follows:
<tableofcontent>
  <entry chaptername="Foreword" page="2"/>
  <entry chaptername="Introduction" page="3"/>
  <entry chaptername="Conclusion" page="4"/>
</tableofcontent>
In the chapter section (point 3 in the layout above) the code is inserted at the top to fill the variable entries with the contents:
  <Record element="chapter">
    <SetVariable variable="entries">
      <Copy-of select="$entries"/>
      <Element name="entry">
        <Attribute name="chaptername" select="@title"/>
        <Attribute name="page" select="sd:current-page()"/>
      </Element>
    </SetVariable>

    <PlaceObject>
    ...
Thus, something new is added to a variable using <Copy-of>.
The structure must be loaded at the beginning and saved at the end of the run to ensure that it is always up-to-date.
If the file toc does not yet exist, the command is simply skipped.
The new section data now looks like this and is inserted at position 2 in the layout above (instead of the record existing there)
  <Record element="data">
    <LoadDataset name="toc"/>
    <SetVariable variable="entries"/>
    <ProcessNode select="chapter"/>
    <SaveDataset name="toc" elementname="tableofcontents"
                 select="$entries"/>
  </Record>
On the next run, the command <LoadDataset> takes effect and opens the previously saved XML file.
The layout ruleset searches for a section for the tableofcontents element, which is the root element of the saved file.
This has to be added to the layout rules (position 1 in the layout above):
<Record element="tableofcontents">
  <PlaceObject>
    <Table padding="5pt">
      <ForAll select="entry">
        <Tr>
          <Td><Paragraph><Value select="@chaptername"/></Paragraph></Td>
          <Td><Paragraph><Value select="@page"/></Paragraph></Td>
        </Tr>
      </ForAll>
    </Table>
  </PlaceObject>
  <ClearPage/>
</Record>
A table is output with one line for each child element entry.
The subsequent page break shifts the subsequent text backwards.
This means that you have to run through the document three times before the table of contents is correct:
-
In the first pass, the data structure is compiled.
-
Afterwards the table of contents can be created, the page break shifts the content one page backwards, the data structure is updated accordingly.
-
Only in the third pass is the table of contents correct.
If you know that the table of contents will only take up one page, you can insert the page break in the first pass.
This saves you one pass.
Sorting of keyword indexes
As a rule, keyword indexes can be found at the end of a document in order to quickly locate relevant pages in printed works.
These keywords can be words or even article numbers or other designations.
In contrast to the table of contents (which is usually at the front of a publication), the data only has to be compiled; there is usually no need to save the data temporarily for the next run.
Example
Keyword index from the example
By their nature, the examples are always somewhat contrived, and that is especially the case here.
The index is compiled differently in practice, of course.
Since only the sorting is to be shown here, the keyword and the page number are given:
<data>
  <keyword word="Giraffe" page="1"/>
  <keyword word="Garage" page="2"/>
  <keyword word="Greeting" page="3"/>
  <keyword word="Elevator" page="4"/>
</data>
The layout file consists of three sections, which are explained individually.
<Layout xmlns="urn:speedata.de:2009/publisher/en"
  xmlns:sd="urn:speedata:2009/publisher/functions/en">

  <Record element="data"> ①
    ...
  </Record>

  <Record element="keyword"> ②
    ...
  </Record>

  <Record element="index"> ③
    ...
  </Record>
</Layout>
The framework for sorting and output of the keyword index
①
The frame that first assembles the entries, sorts and then outputs them.
②
Here the entries are stored individually in the variable indexentries.
③
The sorted entries are output in a table.
The section data is the first part from the previous listing:.
<Record element="data">
  <SetVariable variable="indexentries"/> ①
  <ProcessNode select="keyword"/>

  <SetVariable variable="index">  ②
    <Element name="index">
      <Makeindex select="$indexentries" sortkey="name" section="section"
                 pagenumber="page" />
    </Element>
  </SetVariable>

  <ProcessNode select="$index"/>  ③
</Record>
①
An empty variable indexentries is declared. This is filled with the individual elements in the record keyword (see below).
②
The now filled variable indexentries is supplemented by the parent element index, sorted and stored in $index.
③
Here the content of the variable $index is interpreted and executed as a data structure (see the addition below).
The command <Makeindex> sorts and groups the data passed in the attribute select.
Sorting is done using the attribute specified in sortkey.
The grouping is based on the first letter of the sort key.
The element structure, which is created with the command <Makeindex>, is as follows:
<index>
  <section name="E">
    <indexentry name="Elevator" page="4"/>
  </section>
  <section name="G">
    <indexentry name="Garage" page="2"/>
    <indexentry name="Giraffe" page="1"/>
    <indexentry name="Greeting" page="3"/>
  </section>
</index>
The section on the keyword element (insert at position 1 in the listing The framework for sorting and output of the keyword index) is kept simple, and corresponds to the “copy of” pattern (see Copy of).
Here the variable indexentries is supplemented by one entry each.
<Record element="keyword">
  <SetVariable variable="indexentries">
    <Copy-of select="$indexentries"/>
    <Element name="indexentry">
      <Attribute name="name" select="@word"/> ①
      <Attribute name="page" select="@page"/>
    </Element>
  </SetVariable>
</Record>
①
In the current publisher version, the entry that is sorted must be saved in an attribute called name.
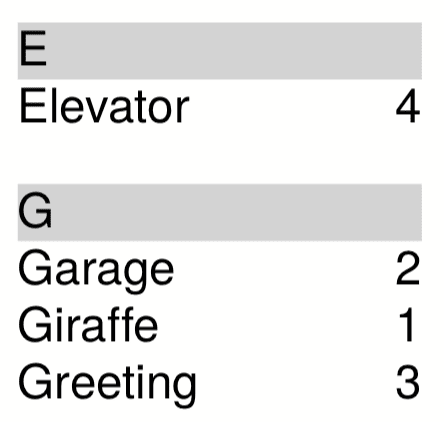
In the last part the table is output (insert at position 3 in the listing The framework for sorting and output of the keyword index).
For each section (element section in <Makeindex>) a line in light grey is output with the sort key.
Then, for each entry within this section, a line is output with the name of the entry and the page number.
<Record element="index">
  <PlaceObject column="1">
    <Table width="3" stretch="max">
      <ForAll select="section">
        <Tr break-below="no" top-distance="10pt">
          <Td colspan="2" background-color="lightgray">
            <Paragraph><Value select="@name"></Value></Paragraph>
          </Td>
        </Tr>
        <ForAll select="indexentry">
          <Tr>
            <Td>
              <Paragraph><Value select="@name"/></Paragraph>
            </Td>
            <Td align="right">
              <Paragraph><Value select="@page"/></Paragraph>
            </Td>
          </Tr>
        </ForAll>
      </ForAll>
    </Table>
  </PlaceObject>
</Record>